Guide to Pelleted Native Seeds for Restoration Planting
If you've ever tried to re-establish a natural area, you know how tricky direct seeding can be. Getting those tiny, often oddly shaped native seeds into the soil effectively and uniformly is a real challenge, especially on larger projects. This is where pelleted native seeds for restoration planting come into their own, offering a practical solution to some of these long-standing issues.
Our research consistently shows that specialized seed treatments can significantly improve germination and establishment rates. For instance, manufacturer specifications for many pelleted seed products often report enhanced flowability by up to 30% compared to raw seeds, which can make a huge difference in successful project outcomes. Let's dive into why these coated seeds are becoming a go-to for many restoration professionals.
Why Native Seed Matters: The Core of Restoration
Restoring native plant communities is far more than just planting pretty flowers; it's about rebuilding an entire ecosystem. These native plants, the ones that naturally belong in a specific ecoregion, are the foundation for local wildlife, insects, and healthy soil microbes. They've evolved to thrive in the area's climate and soil, forming stable, resilient habitats that support biodiversity.
When we talk about ecological restoration, we're aiming to reverse damage from things like development, agriculture, or invasive species. This means bringing back the original plant life to help the whole system recover. Using native seeds ensures that the genetic material is appropriate for the site, which is crucial for long-term success and genetic diversity as of 2026.
What Are Pelleted Native Seeds, Anyway?
Pelleted native seeds are essentially individual seeds that have been encapsulated in a specialized coating material. Think of it like a tiny, biodegradable jacket for each seed. This coating changes the seed's physical properties, making it larger, heavier, and more uniform in shape.
The core idea behind seed pelleting is to improve handling and planting efficiency. These coatings aren't just filler, though; they're often designed to provide specific benefits to the seed as it germinates and establishes.
How the Pelleting Process Works
The pelleting process involves carefully applying layers of coating material around each individual seed. This is typically done in a drum or pan coater, where seeds are tumbled while a binding agent and the coating material are gradually added. It’s a delicate balance to build up the layers evenly without damaging the seed inside.
The goal is to create a smooth, spherical pellet that’s consistent in size and weight. This consistency is what makes them so much easier to work with, especially when using mechanical planters.
What's Typically in a Seed Pellet Coating?
A seed pellet's coating can be a complex mixture, tailored for the specific seed species and intended use. While the exact formulation is often proprietary, common components include:
- Inert Fillers: Materials like clay, diatomaceous earth, or calcium carbonate make up the bulk, providing the desired size and shape.
- Binders: Adhesives such as starches, gums, or polymers hold the coating layers together and to the seed.
- Nutrients: Micronutrients or macronutrients, like phosphorus or zinc, can be incorporated to give the seedling an early boost.
- Moisture-Retaining Agents: Hydrophilic materials can absorb and hold water, helping the seed in dry conditions.
- Pest and Disease Protection: Fungicides or insecticides might be added to protect the seed and young seedling from common threats.
- Germination Enhancers: Hormones or other stimulants can sometimes be included to encourage quicker, more uniform germination.
The Real Benefits of Using Pelleted Native Seeds
Using pelleted native seeds can bring some serious advantages to your restoration project, particularly when you’re working on a larger scale or in challenging conditions. The benefits really boil down to improved planting and better early establishment.
Boosting Your Planting Efficiency
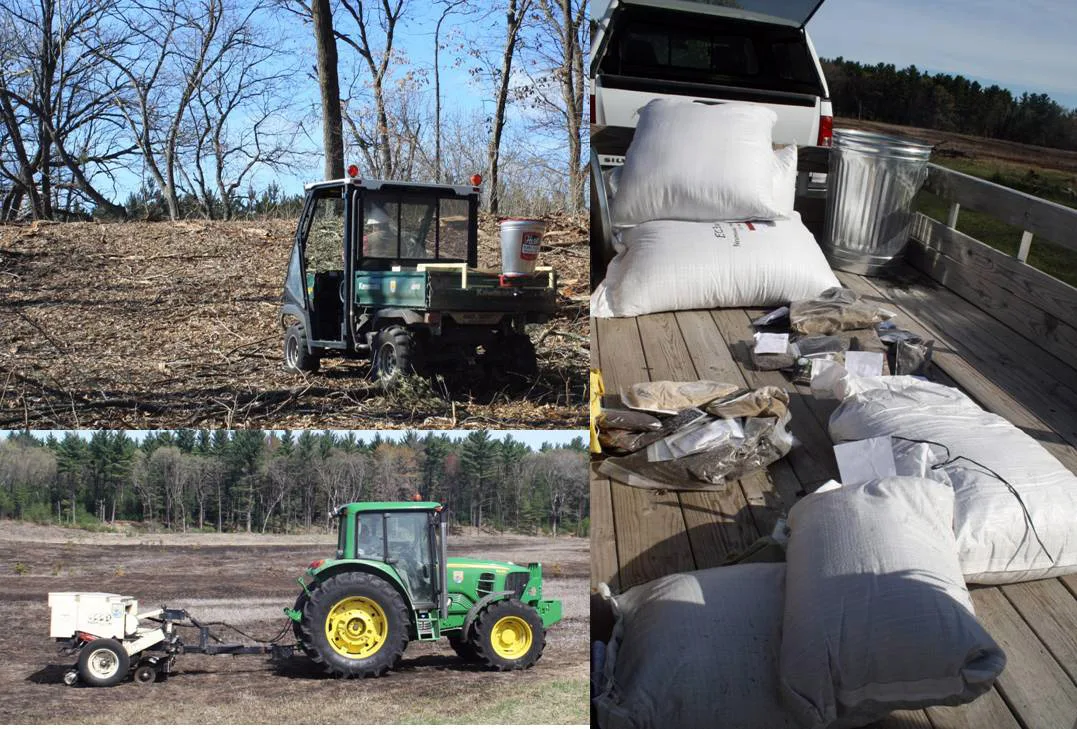
One of the biggest wins for pelleted seeds is how they improve mechanical planting. Raw native seeds, especially those with awns, hairs, or irregular shapes, can be notoriously difficult to flow smoothly through seed drills or broadcast spreaders. They often clump, bridge, or feed unevenly.
Pelleted seeds, being larger and more uniform, flow like a dream. This means:
- Precise Seeding Rates: You can calibrate your equipment much more accurately, ensuring you're putting down the right amount of seed per square meter.
- Uniform Distribution: Each seed gets evenly spaced, leading to a more consistent stand of plants across the site.
- Reduced Equipment Jams: Less downtime spent clearing clogged machinery, keeping your project on schedule.
- Easier Handling: Simply put, larger, rounder seeds are just easier to handle and load into equipment.
Giving Your Seeds a Head Start
Beyond just planting, the coating itself can give your native seeds a crucial advantage in those critical early days. Think of it as providing a tiny, personalized support system.
- Improved Seed-to-Soil Contact: The increased weight and uniform shape help the seed settle better into the soil, crucial for water uptake.
- Moisture Management: Some coatings can absorb moisture, creating a more humid microenvironment directly around the seed, which is vital for germination in drier soils.
- Early Nutrient Supply: If nutrients are included in the pellet, the emerging seedling has immediate access to vital building blocks right when it needs them most.
- Protection from Early Threats: Coatings can provide a physical barrier or incorporate specific agents to deter seed predation by birds or small mammals, or to suppress common fungal pathogens.
The Downsides: Where Pelleted Seeds Might Fall Short
While pelleted native seeds offer some compelling advantages, they're not a silver bullet. It's important to be realistic about their limitations and consider if they're the best fit for every scenario. There are a couple of key areas where they might not be the ideal choice.
The Cost Factor
Let's face it, the biggest hurdle for many projects is the budget. Pelleting adds an extra step and specialized materials to the seed production process, which inevitably drives up the price. You're paying for that added engineering and convenience.
This higher upfront seed cost can sometimes be offset by reduced labor costs or improved establishment rates, but it's not always a guaranteed trade-off. For smaller projects or those with very tight funding, raw, unpelleted seeds might still be the more economically viable option, even if they require more manual handling.
Shelf Life and Specificity Challenges
The very coating that provides benefits can sometimes introduce new complexities. Coatings can sometimes reduce a seed's natural shelf life, especially if they contain moisture-absorbing components or certain biological additives that degrade over time. You need to pay close attention to storage conditions and "plant by" dates.
Another challenge can be the availability of specific local ecotypes in pelleted form. While major restoration species are often available, if your project requires a very specific, rare, or regionally distinct native ecotype, finding it already pelleted might be difficult or impossible. Many specialized native seed growers focus on producing raw, genetically diverse seed specific to very narrow ecoregions.
Pelleted vs. Raw Native Seeds: Making the Right Choice
Deciding between pelleted and raw native seeds really comes down to your project goals, site conditions, and available resources. It's not a one-size-fits-all answer; both have their place in the world of ecological restoration.
| Feature | Pelleted Native Seeds | Raw Native Seeds |
|---|---|---|
| Cost | Generally higher upfront cost | Lower upfront cost |
| Planting Ease | Excellent for mechanical seeding, uniform flow | Can be challenging for mechanical seeding, irregular flow |
| Seed-to-Soil Contact | Enhanced due to uniform shape and weight | Variable, depends on seed shape and planting method |
| Early Protection | Can offer initial pest, disease, or moisture benefits | Minimal inherent protection, relies on site conditions |
| Storage/Shelf Life | Can be reduced; requires careful management | Typically longer, more stable if stored properly |
| Ecotype Availability | May be limited for highly specific local ecotypes | Wider range of specific ecotypes often available |
| Visibility | Easily visible for monitoring | Often difficult to see after planting |
When you're dealing with vast areas, tight deadlines, or difficult-to-sow seeds, pelleted options often win out for their efficiency. If your project is smaller, highly sensitive to genetic origin, or budget-constrained, raw seeds might be the better bet.
When Should You Use Pelleted Native Seeds? (Use Cases)
Pelleted native seeds shine in specific scenarios where their enhanced properties translate into tangible project benefits. Understanding these use cases helps you decide if they're the right tool for your restoration toolbox. It's often about balancing efficiency with precise ecological needs.
Large-Scale Project Efficiency
If you're tackling a big restoration area, say hundreds of acres of rangeland or a vast post-fire landscape recovery, pelleted seeds become incredibly valuable. The ability to use mechanical seeders, like agricultural drills or broadcast spreaders, without constant clogging is a game-changer for project timelines and labor costs. This efficiency gain makes large-scale direct seeding much more feasible and consistent.
Consider mine land reclamation, for example. These sites often involve extensive disturbed areas that need rapid revegetation. Pelleted seeds allow for quicker coverage and more uniform establishment, which is vital for stabilizing soils and jump-starting ecological succession.
Tough Sites and Specific Needs
Beyond scale, pelleted seeds can be a real asset on sites with particular challenges. If you're working with difficult soil conditions, like sandy soils prone to rapid drying, or areas susceptible to high wind erosion, the moisture-retaining or binding agents in the coating can offer crucial early support. The added weight of the pellet also helps keep seeds in place on windy slopes or after light rainfall, preventing them from blowing or washing away.
We've also seen them successfully employed for roadside revegetation, where planting windows are tight and consistency is paramount for both aesthetics and erosion control. The visibility of the larger pellets can even help with post-planting monitoring, making it easier to see where seeds have been laid down.
Crucial Steps for Successful Pelleted Seed Planting
Even with the advantages of pelleted seeds, successful restoration planting isn't just about throwing them on the ground. A methodical approach, from initial assessment to post-planting care, is non-negotiable for achieving your ecological goals. Skip these steps at your project's peril.
Site Assessment and Preparation: Don't Skip This!
Thorough site assessment is the bedrock of any successful restoration project, regardless of seed type. Before you even think about planting, you need to understand the existing conditions. This includes:
- Soil Analysis: Get a detailed soil analysis for pH, texture, and nutrient levels. This informs any necessary soil amendments.
- Hydrology: Understand the water flow and drainage patterns of your site. Is it prone to drought or waterlogging?
- Existing Vegetation: Identify what's currently growing. What native plants are still present? More importantly, what invasive species are lurking?
Once you have this information, you can move to seedbed preparation. This often involves controlling existing weeds, especially invasives, through methods like herbicide application, prescribed burning, or mechanical removal. Sometimes, light soil scarification might be needed to create a better seedbed surface for optimal seed-to-soil contact.
Calibrating Your Equipment: Precision is Key
You've got those wonderfully uniform pelleted seeds; now make sure your equipment is set to handle them correctly. Proper seeding equipment calibration is vital for achieving your target seeding density. Don't assume your drill or spreader settings for agricultural seeds will translate directly.
Always perform a calibration test before hitting the entire site. Run a small amount of seed through your equipment on a tarp or test plot, then weigh the output to ensure it matches your desired application rate (e.g., seeds per square foot or pounds per acre). Adjust settings as needed until you're spot on.
Timing Is Everything: When to Plant for Success
The timing of your planting can make or break your project. Native seeds, even pelleted ones, have specific dormancy cycles and germination requirements tied to seasonal cues. Planting too early or too late can lead to poor establishment.
Generally, dormant season planting (late fall to early spring in many temperate climates) is preferred. This allows seeds to undergo natural cold stratification, which is a period of cold, moist conditions needed to break dormancy for many native species. Research specific species recommendations for your region.
Common Mistakes to Avoid with Pelleted Native Seeds
Even experienced restorationists can fall into common traps when working with pelleted native seeds. Being aware of these pitfalls can save you a lot of headache, wasted effort, and project funds. Let's make sure you're set up for success.
Ignoring Dormancy Requirements
One of the biggest blunders is treating pelleted seeds like conventional annuals that will just pop up whenever. Many native seeds, even with a coating, still have innate dormancy mechanisms. If you plant them without understanding their specific needs for cold stratification or scarification, they simply won't germinate, and your project will fail to establish.
Always check the seed supplier's specifications for dormancy requirements. Some pelleted seeds might have pre-treatments, but don't assume. If natural stratification isn't feasible, you might need to artificially stratify seeds before planting, or select species known to germinate quickly without complex dormancy breaking.
Underestimating Weed Competition
A common misconception is that pelleted seeds, with their early advantages, somehow negate the need for rigorous weed management. This couldn't be further from the truth. Weeds are often faster-growing and more aggressive, especially in disturbed sites, and they will quickly outcompete your slow-to-establish native seedlings for light, water, and nutrients.
Effective weed control needs to happen both before planting (as part of site preparation) and crucially, after your seeds are in the ground. Plan for post-planting monitoring and implement targeted weed management strategies, whether that's mechanical removal, careful spot-spraying, or even prescribed grazing in appropriate systems.
Improper Seed Storage
Pelleted seeds, particularly those with specialized coatings containing biologicals or moisture-absorbing agents, can be more sensitive to storage conditions than raw seeds. Improper storage can drastically reduce seed viability. If the coating absorbs too much moisture, it can initiate premature germination or lead to mold growth. If it gets too hot, the life of the seed can shorten significantly.
Always store pelleted seeds in cool, dry conditions, away from direct sunlight and extreme temperature fluctuations. Follow the manufacturer's recommendations for storage duration and temperature ranges. Don't buy more than you need for the immediate planting season unless you have proper, controlled storage facilities.
Ensuring Success: Expert Tips for Restoration Professionals
Beyond avoiding common mistakes, there are proactive steps and best practices that can significantly increase your chances of success with pelleted native seeds. These insights come from years of practical application and scientific research in the field of ecological restoration. Thinking strategically before, during, and after planting is critical.
Source Local Ecotypes When Possible
This is arguably one of the most important pieces of advice for any native planting. Always prioritize sourcing native seeds that are genetically appropriate for your specific ecoregion, often referred to as local ecotypes. These plants are best adapted to your local climate, soil, and pest pressures. Using non-local genetics, even of the same species, can lead to poor establishment, reduced long-term viability, and can even compromise the genetic integrity of existing native populations.
If pelleted forms of your precise local ecotype aren't available, you might need to weigh the benefits of pelleting against the genetic risks. Sometimes, it's better to use raw, locally sourced seeds than a pelleted product from a distant, non-local population. Check with organizations like the USDA NRCS or local university extension services for guidance on ecotype sourcing in your area.
Test Your Seeds (and Your Soil!)
Never go into a large-scale project blind. Seed testing standards, often overseen by official organizations, provide crucial data. Before you commit to a large purchase or a big planting day, get your seed tested for viability (what percentage is actually alive and capable of germinating) and purity (how much inert material or weed seed is present). This tells you exactly what you're getting.